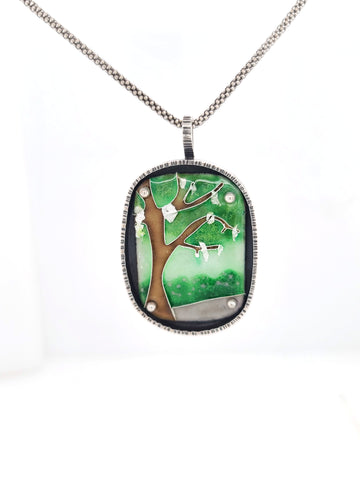
Step by Step Enamel Pendant Video
Recently I made a short video of the steps for making some of my new enamel jewelry pieces. You can watch the process in this video:

You have no items in your cart
Recently I made a short video of the steps for making some of my new enamel jewelry pieces. You can watch the process in this video:
Ok, I'm trying to start blogging again (it is has been YEARS!!) and I want to show more behind the scenes stuff, new pieces, etc.
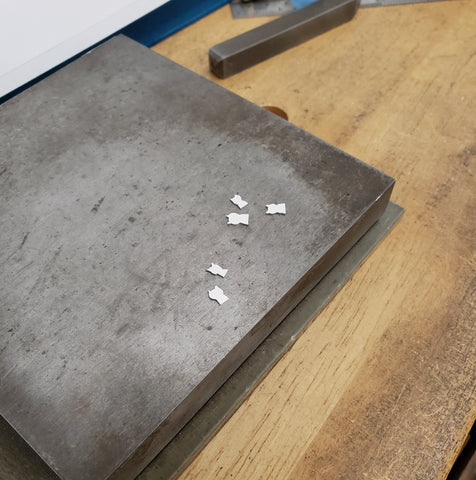
So. Today I made these little nugget necklaces with tiny cats on them! :)
I've been playing with different cat ideas for a while, and this morning I was able to play with this idea. It starts by cutting out all the little cat shapes. I cut each of them from silver sheet using a jeweler's saw. I wanted them to all be a little different so I cut them out freehand, meaning no template or drawing first, just the saw and the metal.
Next I made some nuggets. I like to use scrap sterling silver to create the nuggets, making little piles and then melting them together into a blob. Once the blobs are cooled down I can flatten them with a hammer until they are the thickness and size that I would like.

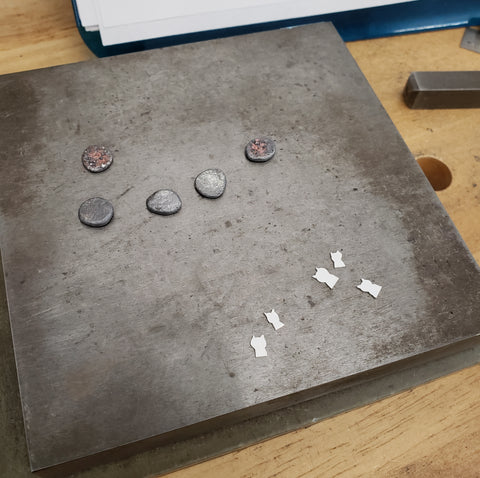
After those important steps were finished it was just a matter of soldering the little cats to the nuggets, adding the loop at the top, and then polishing. I like to oxidize the silver first, so that all the little crevasses are black and the cats will have little shadows around them. I like the details that end up showing as a result of the oxidation.
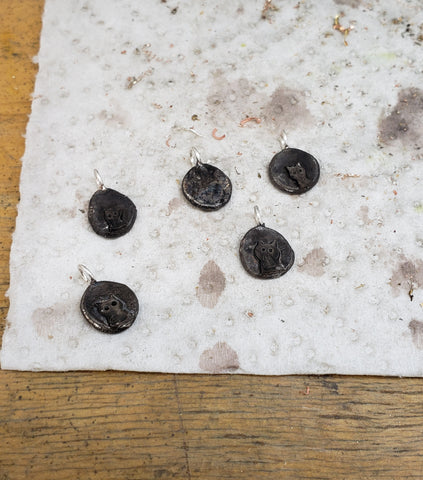
I love the character these little guys have, and I hope there are other cat lovers out there who love them too!

Now available in my shop: https://www.kathrynriechert.com/products/little-cat-nugget-necklaces
This is totally unrelated to jewelry, but that's ok with me! I'm excited and delighted to say that my sweet Maya Pants went viral! (Or her butt did :D )
I noticed this face on her butt and snapped a quick photo. After it received many likes and comments on my personal facebook page I had Scott put it out to the world to see if other people liked the face too, turns out they did!
Her butt has been viewed over a million times on Imgur, and made yahoo news, The Daily Mail, and more!!
(PS, the face only appears when she sits with her tail tucked under, most of the time she does not have a face there.) And to balance out the image, here is one of my favorite pics of her:
Ok! So, at my class in October I cut an Ethiopian opal (actually I cut 2) that has changed a lot over time. We learned that Ethiopian opals in particular have water content issues called hydrophane.
One of the stones was clear when I received it, and if you put it in water and looked very closely you would see a red flash. In the months (it seriously took over a month) since class it has turned a milky white color with a pretty red flash that is prominent. I have explained the change to people when they see the stone, but I don't think they fully understand the dramatic nature of it. And hey, I get it, they weren't there. But look at this!!
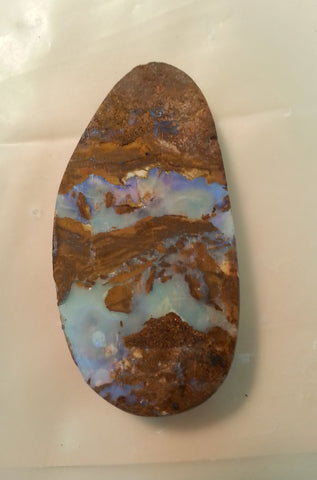
I bought a mixed lot of Ethiopian opal online and recently it arrived to me. It was sold to me by weight, and the largest piece was an (ugly) lumpy no color thing. :/ That's ok, it happens, and that is the risk you take buying things this way. Also, there are a lot of lovely (smaller) pieces too.

Do you see the large lumpy piece and the milky blue piece I circled?
Today I was looking at them and thinking again about the ugly lumpy one, and thinking that it was 'potch' (unprecious material found around opal, or basically opal but without any color play) Usually potch is something you grind off of a stone and don't want. So, it's particularly annoying to have a giant piece of it in a lot sold by weight. Oh well.
And then I thought, 'I wonder if it will change in water.' So I took it and the milky blue one and put them in water. After a few minutes I looked at them:

Look at the how the water is absorbing into the stone!! Changing it to transparent! And here it is a few hours later:

Notice that the milky blue is now a transparent green.
Our friend Lumpy:

and our friend Milky Blue:

And well, even though Lumpy went transparent for me, still no play of color, making it an ugly piece I'm unlikely to cut, BUT, I am excited to have visuals to share showing the changes that happen with hydrophane material!!
This necklace was made from coins owned by artist Luba Lowry. Luba is a fabulous painter who is a member of Gallery 209 here in Savannah. (She also has her own gallery in Savannah's City Market.) Last year Luba asked me to make a necklace using coins from her home country of Russia. She loves my little enameled flowers, and we both liked the blue patina that had formed on one of the coins. She also wanted me to add some text to the piece. Aside from that, I had free rein.
The original sketch from when we first spoke:

Cool patina:

Arranging and making decisions:

Building the pieces:


And.... the finished necklace, which I'm in love with and want to keep!!


 And it was fun and exciting, and maybe just a little addicting. I left my machines set up, because I was tired and figured I would clean and tidy everything in the morning.And then this morning I got up early and thought, 'Maybe while it's all still set up I could cut a few more...' So I made these:
 And then after photographing them and before cleaning everything up, I thought, 'You know, it would be a shame to put everything away without playing with the Coober Pedy...' So I cut some of that too:
 And then I had lunch, and started putting together a list of things to work on this afternoon/evening. But a funny thing happened when I went back into my studio. I thought, 'You know, It'd be a shame to leave out the Mexican opal.' the other part of my brain replied, 'Yeah, but you'd have to use the saw on them first, and you didn't set it up yet, and then you'd have to clean it up...It would be a bigger mess.' So I replied to myself, 'You are right. If I am going to go to the trouble messing with the saw, I might as well cut some of the boulder opal too...' And then this happened:
 And it was 7:30pm. So THIS is what I did today. I cut 31 stones!
 And if I include last night....:
 So. I still have to clean up the big mess, and I need to get busy setting some stones!
Recently I took a class at the William Holland School of Lapidary Arts. My class was in opal cutting, and it is an understatement to say I ABSOLUTELY LOVED IT!
With the class, you paid for an opal kit (pieces of several different types of rough opal, both precious and non-precious) and you could also bring along opal of your own if you had it.
For about 10 years (yes, a whole decade!) I have had this piece of Australian boulder opal. I had never set it, because it was such a big, odd shape, and the back wasn't flat (so it rocked in place.) I'm told that type of 'saddleback' is a common cutting technique used to increase the weight, and therefore price, of finished opals. I brought this piece of opal with me to class in hopes of flattening the back and making the opal usable for my purposes. After I flattened the back, this is what it looked like from the front and back:

It occurred to me that the back was SO MUCH PRETTIER than the front, so I decided to take drastic measures.
First I cut the opal into 2 pieces, and then I made the shapes more pleasing:


Next I added dop sticks to the back (speaking of which, I think I dreamed about dop sticks last night?) and ground and polished the opals with their new front sides:


Skip forward and I am back in my studio with my finished opals. And I had a mission to finally set these 2 opals and make them into jewelry! So, I'm making my bezels in the next picture:

Skip forward a bit, and here I am assembling the chain as I make it, notice my fingers are filthy from polishing!!


Skip forward even more, and here we have it! Just in time for my next art show in Tampa on 10/26-10-/27.


It's a fact of life that sterling silver tarnishes. How fast it tarnishes depends on a number of factors, including how often you wear it, how you store it, what chemicals it comes into contact with (bleach, pool chemicals, detergents...), and even your body chemistry can make it quickly darken if you have a high acidity level! It may sound high maintenance to you, but don't fret, it's really not too bad! Here are some tips toward maintaining your silver jewelry.
The point of owning jewelry is to enjoy wearing it! So do just that! If you are wearing your silver posey ring everyday, it will encounter constant abrasion from everyday situations. For example, it rubs on your jeans when you reach in your pocket. All this constant contact will keep any tarnish from building up on the surface.
If you were to set your ring on a shelf and walk away for a few months, it will happily darken in color. In that situation nothing is preventing the sulfides in the air from building up on the surface. I highly recommend that you store your jewelry in a small plastic bag, as it is a preventative measure that slows tarnish. I ship almost every piece of jewelry in a small ziplock bag, and you can use this bag to store things if needed.Let's say that you bought 3 rings from me (thanks!!) You wear one ring almost everyday. You set one ring on a shelf. You wear the 3rd ring to swimming practice at the YMCA. A few months go by... The first ring looks just fine. The 2'nd ring has a yellow/brownish tarnish on the surface. The 3rd ring turned black from pool chemicals. What now?
Polishing cloths are your new best friend!
My favorite polishing cloth is Sunshine brand. It is what I sell in my shop, and often include a sample of with purchases. It's gentle, and does a great job of making things shiny again.
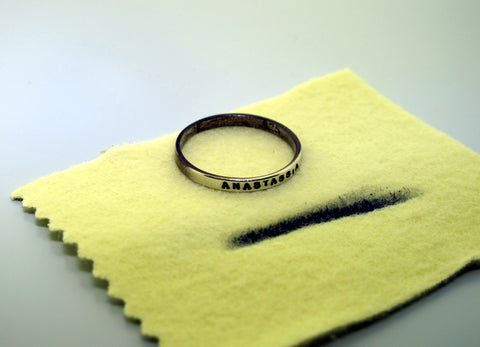
When you use the cloth (rubbing in on the ring's surface), it will turn black. That does not mean it is removing the patina from the lettering on your ring, in fact it just means it's cleaning. Notice in this next picture that a perfectly shiny ring still made the cloth turn black:

Let's say that you didn't have your polishing cloth on hand, so you used a liquid style jewelry 'dip' or solution. Sometimes that is fine, (and a GREAT option for removing tarnish from chains!) however some solutions are very strong and will not only etch glass and eat away stones and pearls, but they will remove the patina from the lettering in your ring! (I recommend carefully reading the label of any cleaning solution before dipping your jewelry into it.)
Now what? How do you make your lettering dark again?
The very easiest method using things you would likely have on hand involves a Sharpie marker and a polishing cloth.

You want to use the Sharpie marker to fill in the lettering on the ring. You will get marker on the surface of the ring too, but that's expected. The main thing is make sure the marker fills in the letters. After you are done you will use the polishing cloth to clean the surface of the ring. The cloth does not reach into the stamped letters, so the marker will dry and remain inside the lettering. Cleaning the Sharpie off of the surface is much easier if you work quickly and don't give it a chance to dry.

That's it! :)
Before I end this post, I also wanted to reference this website, as I felt it gives a more thorough explanation of tarnish and various cleaning methods.
My first experiments with sculpture were done with wire. I was in high school and created little wire ornaments, and even a huge (2 ft tall) wire dragon. It was a love of art (in particular sculpture) that led me to art school, and into the Metals and Jewelry program. I saw jewelry as small scale sculpture.
Today I discovered these pieces from what would have my second year of college, I believe they are from 2000. The chicken ring was part of a series of chickens I made. The elephants were just for fun. The littlest elephant is just ridiculously tiny! I think I was seeing how far I could push the scale. It is the only one without tusks. The elephants are made of fine silver.
The chicken ring is made of sterling silver and fine silver. It has wings that flap.


Recently this product was recommended to us by Susie of fabulous BoyGirlParty fame. I figured with all it's positive reviews it was worth a shot. (Well, pretty much anything that might consolidate all the cat scratching to one human approved location is worth a shot!) I bought it and anxiously awaited it's arrival. Yesterday was the day it came...
I excitedly took it out of the box and sang the Maya Song to get the cats to come to the living room. In case you are wondering, the Maya Song goes like this, 'Maya, Maya, BoBya, Banana Fana, Popaya, Papaya, Papaya, Papaya, Maya' (her favorite part is the 'Papaya'). Both cats came running down the hall into the living room!
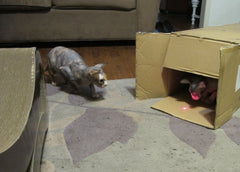
And Maya ran straight into the box:

Ok, I should have seen that coming, but....new cat toy guys! Get excited! Come scratch on it!!!
Ruby meanwhile was content to play with my camera strap:

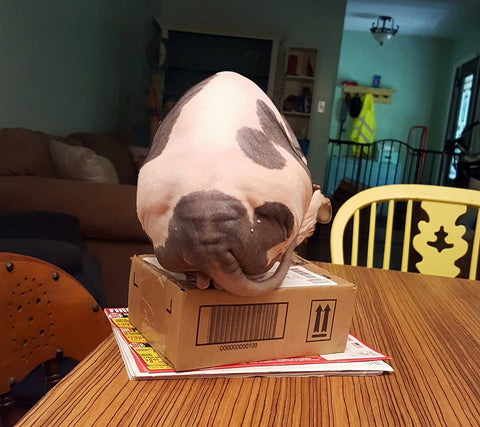
Time elapsed and my coaxing to get them to show even the faintest interest was not working. I resorted to setting Ruby on top of it:
 She was unimpressed and just wanted to sit in my lap. Maya was happy in her box.
Dave and I decided to play dirty, and we got out the laser pointer!


We succeeded in getting Maya out of the box, however as soon as the laser went on top of the scratching lounge, this is what happened:
 Yep. Maya retreated back to the box. She also spent a little time scratching on the inside walls of the box!!
Sigh. I decided to let them work up to using it on their own, and I don't have the heart to take away the box (yet). So both now occupy the middle of the living room...and I'm still waiting for the exiciting moment when they might, you know, actually USE the scratching lounge!!
Meet Bailey, she is about 4 years old, cute as can be, overflowing with energy, and my shadow everywhere I go.

We adopted her from Georgia Animal Rescue and Defense when she was just a puppy.
