It's a fact of life that sterling silver tarnishes. How fast it tarnishes depends on a number of factors, including how often you wear it, how you store it, what chemicals it comes into contact with (bleach, pool chemicals, detergents...), and even your body chemistry can make it quickly darken if you have a high acidity level! It may sound high maintenance to you, but don't fret, it's really not too bad! Here are some tips toward maintaining your silver jewelry.
The point of owning jewelry is to enjoy wearing it! So do just that! If you are wearing your silver posey ring everyday, it will encounter constant abrasion from everyday situations. For example, it rubs on your jeans when you reach in your pocket. All this constant contact will keep any tarnish from building up on the surface.
If you were to set your ring on a shelf and walk away for a few months, it will happily darken in color. In that situation nothing is preventing the sulfides in the air from building up on the surface. I highly recommend that you store your jewelry in a small plastic bag, as it is a preventative measure that slows tarnish. I ship almost every piece of jewelry in a small ziplock bag, and you can use this bag to store things if needed.
Let's say that you bought 3 rings from me (thanks!!) You wear one ring almost everyday. You set one ring on a shelf. You wear the 3rd ring to swimming practice at the YMCA. A few months go by... The first ring looks just fine. The 2'nd ring has a yellow/brownish tarnish on the surface. The 3rd ring turned black from pool chemicals. What now?
Polishing cloths are your new best friend!
My favorite polishing cloth is Sunshine brand. It is what I sell in my shop, and often include a sample of with purchases. It's gentle, and does a great job of making things shiny again.
When you use the cloth (rubbing in on the ring's surface), it will turn black. That does not mean it is removing the patina from the lettering on your ring, in fact it just means it's cleaning. Notice in this next picture that a perfectly shiny ring still made the cloth turn black:

Let's say that you didn't have your polishing cloth on hand, so you used a liquid style jewelry 'dip' or solution. Sometimes that is fine, (and a GREAT option for removing tarnish from chains!) however some solutions are very strong and will not only etch glass and eat away stones and pearls, but they will remove the patina from the lettering in your ring! (I recommend carefully reading the label of any cleaning solution before dipping your jewelry into it.)
Now what? How do you make your lettering dark again?
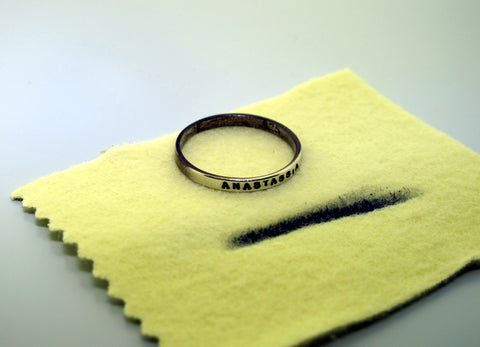
The very easiest method using things you would likely have on hand involves a Sharpie marker and a polishing cloth.

You want to use the Sharpie marker to fill in the lettering on the ring. You will get marker on the surface of the ring too, but that's expected. The main thing is make sure the marker fills in the letters. After you are done you will use the polishing cloth to clean the surface of the ring. The cloth does not reach into the stamped letters, so the marker will dry and remain inside the lettering. Cleaning the Sharpie off of the surface is much easier if you work quickly and don't give it a chance to dry.

That's it! :)
Before I end this post, I also wanted to reference this website, as I felt it gives a more thorough explanation of tarnish and various cleaning methods.


 And it was fun and exciting, and maybe just a little addicting. I left my machines set up, because I was tired and figured I would clean and tidy everything in the morning.And then this morning I got up early and thought, 'Maybe while it's all still set up I could cut a few more...' So I made these:
 And then after photographing them and before cleaning everything up, I thought, 'You know, it would be a shame to put everything away without playing with the Coober Pedy...' So I cut some of that too:
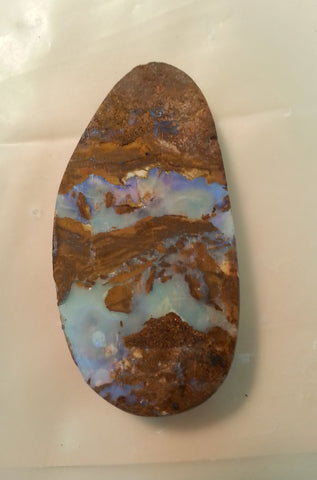
 And then I had lunch, and started putting together a list of things to work on this afternoon/evening. But a funny thing happened when I went back into my studio. I thought, 'You know, It'd be a shame to leave out the Mexican opal.' the other part of my brain replied, 'Yeah, but you'd have to use the saw on them first, and you didn't set it up yet, and then you'd have to clean it up...It would be a bigger mess.' So I replied to myself, 'You are right. If I am going to go to the trouble messing with the saw, I might as well cut some of the boulder opal too...' And then this happened:
 And it was 7:30pm. So THIS is what I did today. I cut 31 stones!
 And if I include last night....:
 So. I still have to clean up the big mess, and I need to get busy setting some stones!